MAPS OF HISTORY · WWI · ALL CHAPTERS · CHAPTER 1
CHAPTER 1 · JUNE–AUGUST 1914 · JUL 1914
The Powder Keg
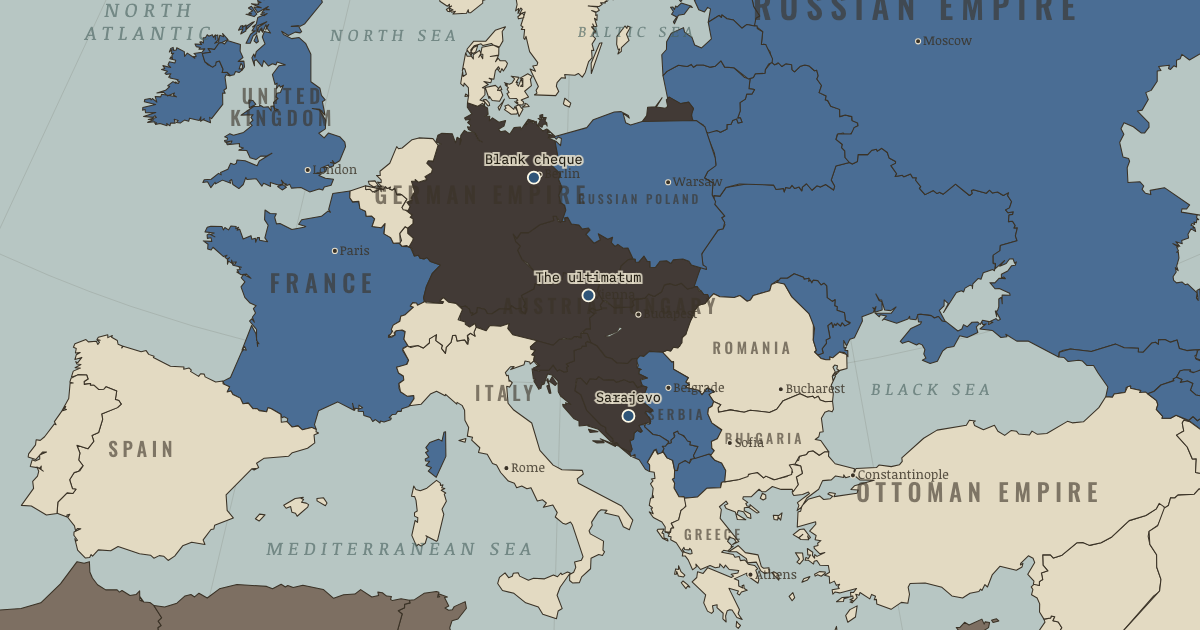
The map above is the world of JUL 1914 — The powder keg.
BRIEF EXPLANATION — THE ESSENTIAL ARGUMENT
The question that opens this whole atlas is how the murder of one man in a Balkan city could pull five great powers into a general war within five weeks, and the answer lies in the machinery Europe had built to keep itself safe. By 1914 the continent had divided into two alliances, with Germany and Austria-Hungary on one side and France and Russia on the other, while Britain stood loosely attached to the second. Each alliance was meant to deter attack by promising that a blow against one member would be answered by all, much as a modern mutual-defence pact tries to make aggression too costly to attempt. The hidden danger was that the same promise could spread a local quarrel outward rather than contain it. When Austria-Hungary resolved to crush Serbia for the killing, Germany backed it, Russia moved to protect Serbia, and the two blocs slid toward each other.
What turned a diplomatic crisis into an unstoppable one was a military procedure called mobilization. This was the process of calling up reserve soldiers and moving them to the frontier by railway, following timetables that had been fixed years in advance. Because the plans depended on trains running in a precise sequence, any delay risked leaving an army half-formed while its enemy stood ready. Each government therefore feared that hesitation would be punished with defeat. Every leader still had real choices in July 1914, yet each military step shortened the time left for the next decision and made reversal harder. The crisis combined a structural trap with deliberate choice, because the alliance system supplied the mechanism while particular men, above all in Vienna and Berlin, chose to keep it running.
GUIDED EXPLANATION
Europe entered the crisis already divided into two armed camps, yet the alliances did not go to war on their own, because at each stage a government had to choose. Austria-Hungary decided to use the assassination of the heir to its throne as the occasion to break Serbian power for good, since it saw Serbian-backed nationalism as a threat to its own survival. Germany gave Vienna unconditional backing, the so-called blank cheque, which encouraged a hard line. Russia then ordered mobilization to deter Austria-Hungary and shield Serbia, a fellow Slavic state whose defeat would leave Russia weaker in the Balkans. Each of these decisions was a deliberate act rather than an automatic reflex of the alliance system.
Military plans then made every decision harder to undo. Germany expected to fight France and Russia at the same time, so its war plan opened with an attack on France through neutral Belgium, aiming to defeat one enemy before the other was ready. Germany declared war on Russia on 1 August, on France on 3 August, and sent its troops across the Belgian frontier on 4 August, which brought Britain into the war as the guarantor of Belgian neutrality. The map thus shows a Balkan crisis becoming a continental war within days, as leaders chose escalation inside a system that rewarded whoever moved first.
The sequence matters more than the image of dominoes falling by themselves. On 23 July Austria-Hungary sent Serbia an ultimatum written to be difficult to accept, and although Serbia agreed to most of its demands, Vienna declared war on 28 July and shelled Belgrade. Germany feared that waiting for Russia’s slow mobilization would ruin its two-front plan, and it therefore pressed forward rather than let the moment pass. Britain’s cabinet stayed divided until the invasion of Belgium settled the question. Every government acted under pressure, but none lost all freedom of action, so responsibility falls most heavily on the leaders in Vienna and Berlin who used the crisis to seek war, while Russia’s early mobilization and other decisions helped accelerate the final chain.
DEEP EXPLANATION — EVIDENCE & INTERPRETATION
The system and the choice
Historians agree about the sequence of events in 1914 but divide over how to assign responsibility, and the disagreement is really about where to place the balance between structure and choice. Fritz Fischer argued that German leaders were willing to risk a continental war to secure larger ambitions. Christopher Clark instead described a crisis in which several governments misread one another and stumbled forward. These readings are not incompatible, because alliances and war plans explain how a Balkan dispute could spread so fast, yet they do not sign declarations of war. Vienna rejected Serbia’s far-reaching concessions because influential figures wanted a military solution, Berlin issued its unconditional promise of support knowing Russia might intervene, and Russia’s general mobilization then narrowed Germany’s room to wait. The most useful judgment separates capacity, pressure and decision: the system provided the means of escalation, but officials under strain chose to use them.
The mobilization trap
Mobilization was dangerous because an army of millions could only move through a country’s rail network in one carefully sequenced pattern, and Germany’s plan assumed that any war with Russia also required an immediate campaign against France. Once the trains began, redirecting thousands of units invited congestion and collapse, which is why generals told their governments that a mobilization order could not easily be recalled. The claim that timetables alone caused the war goes too far, however, because political leaders had designed and accepted plans that narrowed their own options, and they could still have paused or negotiated at real but bearable risk. The deeper problem was reciprocal fear, since any delay might allow an opponent to concentrate first, which turned every preparation into a signal of attack. This is a version of what specialists call a security dilemma, in which measures meant to make one state safer make its rivals less safe and provoke the very response they were designed to prevent.
New here? Chapters 1–2 of every atlas are free to sample, and the WW2 atlas is free in full. One membership opens all thirteen — the Cartographer’s Circle.
THE SITES
ON THIS DAY
WHY IT HAPPENED
The alliance machine. Bismarck built alliances to isolate crises; his successors built ones that connected them. By 1914 a Balkan quarrel mechanically summoned five great powers: Austria could not punish Serbia without Russia, Russia could not face Austria without Germany intervening, Germany could not fight Russia without first — by plan — attacking France. The system designed to deter war transmitted it instead.
Timetables as destiny. Every staff believed the next war would be won by whoever concentrated first; Germany’s Schlieffen Plan needed France beaten in six weeks before Russia’s slow mobilization arrived. That meant Germany literally could not wait out a Russian mobilization — military logic overrode diplomacy in the exact days when diplomacy needed time. “Mobilization means war” was not a metaphor; it was the operating system.
Austria-Hungary’s existential fear. The Dual Monarchy — eleven nationalities under one aging emperor; note on this map how much of it is not Austria or Hungary — saw South Slav nationalism, sponsored from Belgrade, as a mortal disease. Vienna wanted a local war to destroy Serbia while it still could. The assassination was the pretext; the policy was pre-existing.
Germany’s closing window. Berlin’s planners watched Russia’s French-financed railways and expected to be unbeatable no longer after 1917. A strong current in the leadership reasoned: if war with Russia is coming, better now. Historians still argue how deliberate this was — the Fischer thesis says very; others see reckless brinkmanship that expected Britain to stand aside. Either way, Berlin chose escalation at every branch.
THE TURN
Sarajevo, 28 June 1914. The assassination itself nearly failed — a bomb missed in the morning, and Princip got his chance only because the Archduke’s driver took a wrong turn past the café where he stood. Contingency at its purest: the shot did not make the war, but it handed a war party in Vienna the one pretext that could set the machine running.
WHAT IT CHANGED
The dominoes fall in one week. Between 28 July and 4 August five empires declare war in a chain none of them controls. Watch the next chapter’s arrows: the first consequence of a Balkan murder is a German army group wheeling through Belgium, 1,500 km from Sarajevo.
Britain comes in — over Belgium. The Cabinet was split until German troops crossed the Belgian border; “the scrap of paper” of 1839 gave the interventionists their cause and the public its story. With Britain came the Royal Navy, the City’s credit, and eventually the empire you can see on the world map — a quarter of humanity.
The short-war illusion. Crowds cheer in every capital (less universally than legend says); soldiers expect to be “home before the leaves fall.” The belief was load-bearing: no government would have marched knowingly into fifty-one months. Chapter 3 shows the machine that made them all wrong.
FIELD QUESTION — Was the First World War an accident, a choice — or both? Who, if anyone, was to blame?
The great historians’ quarrel. The “sleepwalkers” reading stresses the machine: alliances, timetables and misread signals produced a war nobody wanted at that scale. The Fischer school answers with documents: Vienna wanted a Balkan war, and Berlin knowingly risked — some say sought — a continental one while its window was open. A fair verdict distinguishes levels: the system made escalation easy, but specific men in Vienna and Berlin chose escalation at each branch point, and Russia’s early general mobilization shortened everyone’s fuse. The transferable lesson is uncomfortable: deterrence systems that reward moving first convert crises into wars — a lesson the nuclear age relearned with different arithmetic.
AN INTERESTING FACT
The archduke’s car survives — a Gräf & Stift double phaeton, parked today in Vienna’s Museum of Military History beside Franz Ferdinand’s bloodstained tunic. Its number plate reads A III 118, which later visitors could not resist parsing as Armistice, 11-11-18 — pure coincidence, but the kind history seems to plant on purpose. And in the crisis’s last days the Kaiser and the Tsar — cousins who signed themselves “Willy” and “Nicky” — traded a final flurry of telegrams, in English, each begging the other to stop a machine both had already set running.
THE DISPATCH
One short letter when a new atlas opens — and the printable study guide for WWI is yours now, free.
NO TRACKING · YOUR ADDRESS IS USED FOR THE DISPATCH AND NOTHING ELSE · UNSUBSCRIBE ANYTIME